Adding Roles
To add permission roles to the system, use the/permissions add command followed by a Discord Role Id and the permission type. Any member with the role that has been added will receive the permission type selected.
.png?fit=max&auto=format&n=rTIXWGIOZm-rjaEU&q=85&s=a572c03b1228acc2139784aadd2da672)
Removing Roles
Removing a permitted role in the system is as easy as running the/permissions remove command followed by the Discord Role Id and the existing permission type. Anybody with the role and no other permitted roles will now be unable to run any permission locked commands.
.png?fit=max&auto=format&n=rTIXWGIOZm-rjaEU&q=85&s=7bffe2ca489266cfc893f84987a71927)
Viewing Permitted Roles
If you need to check which roles have been configured to have certain permissions, use the/permissions list command. When you have ran the command you will be able to view all Admin roles and all Staff roles. If a role was to have been deleted, you will be able to view the id to remove the role.
.png?fit=max&auto=format&n=rTIXWGIOZm-rjaEU&q=85&s=5898d4eb50900faed7fd786aae0cefb8)
System Reset
If you need to quickly reset every setting, use the/reset command to remove all settings relating to the Vision bot inside of your guild. You will be asked before you continue to reset the system.
The reset command does not reset any in-game Vision data such as student merits and behaviour points
System Refresh
If you update your in-game datastores within your settings, the cached datastore names will become out of sync and will no longer display up-to-date information from when you run the command. To fix this, run the/refresh-databases command. Upon running it, you will be prompted before refreshing the database names and once the command has been ran, it will become unavailable for 2 minutes.
We cache datastore names so we do not have to request the current datastore names every time a command has been ran.
System Updates
If you need to update any settings which you provided when you setup the system, you can use the/update command to edit any of the initial settings.
You will be asked which setting you want to update, the settings include:
Command Cooldowns
By default, we enforce cooldowns on some of our commands to prevent spam and abuse, we may also add cooldowns to any commands that may use a lot of resources to run. The current commands on our cooldowns are found below:Behavioural Commands
This page outlines the information needed for using the behavioural commands. It is important that you read the information provided on this page carefully before contacting support that your system doesn’t work. When any behavioural command is ran (includes merit, isolation, detention etc) the command will take affect in-game instantly as long as the server is currently running and the student is in-game when the command has been ran. All behavioural commands will log to the specified log channel, if it has been provided, in the same format as the normal in-game Vision format.Please note, if the Roblox server is not running or the student is not in-game the year group and lifetime analytics will not be updated.
Isolations
The/isolation on command will automatically team, respawn and teleport the student if they are in-game. A notice will also appear on the student’s screen alerting them of the isolation, and the behavioural dashboard will update to reflect the newly added isolation.
The command offers 5 options for usability, they are listed below:
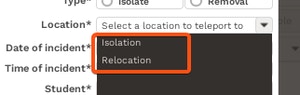
When isolating a student, the destination you provide must match an in-game location. If the location does not match, the student will not be brought to the Isolation room correctly. You can either retrieve it via the named spawns in the workspace system or view the current set ones from the in-game UI..png?fit=max&auto=format&n=rTIXWGIOZm-rjaEU&q=85&s=5415c016e824150084afaa9a294c4870)
Incidents
The/incident command will add to the incident dashboard as normal with the ability to resolve them and view other students involved.
The command asks for 3 required fields and 2 non-required.
Detentions
When the/detentioncommand is ran, the specified student will be alerted in-game when they receive a detention, as well as the behavioural dashboard updating accordingly. The current command options are:
Merits & Behaviour Points
The/meritand /behaviour-pointcommands act very similarly, they both take the same command options and act the same way in-game apart from the on-screen UI being different.
Student Management
When any student management command is ran the command will take affect in-game instantly, as long as the server is currently running and the student is in-game when the command has been ran. All student management commands will log to the specified log channel, if it has been provided, in the same format as the normal in-game Vision format.Please note, if the Roblox server is not running or the student is not in-game the year group and lifetime analytics will not be updated.
Roleplay Name
The/roleplay-name command allows students to change their own roleplay name, as well as staff members being able to change student usernames. You must provide the new name along with the student name if changing someone else’s name.
All names are filtered by our service. However, we cannot guarantee that users won’t bypass the system; therefore, we accept no responsibility for any inappropriate names being sent to Roblox servers.
Timeout Pass
The/timeout-pass subcommands let staff members check if a student has a timeout pass and allows admins to grant or remove passes. This change will take affect instantly giving the student the timeout pass icon and removing it when it has been revoked.
Uniform Pass
The/uniform-pass subcommands let staff members check if a student has a uniform pass and allows admins to grant or remove passes. This change will take affect instantly giving the student the uniform pass icon and removing it when it has been revoked.
User Searching
Using the/search command allows staff members to search for a student to view their information. The command also allows you to view other staff members; however, it displays different details. Each search displays the user’s avatar with a random coloured background.
Student Information
Student Information
.png?fit=max&auto=format&n=rTIXWGIOZm-rjaEU&q=85&s=4a5eddb02ab0c96e0775c56b295e51ff)
Staff Information
Staff Information
.png?fit=max&auto=format&n=rTIXWGIOZm-rjaEU&q=85&s=feac71159bb017f0e6e4c78409a3d0eb)
Personal Profiles
The/search command allows user’s to retrieve their own personal information. The command works the same as User Searching and provides the same information.
School Overview
Analytics
To view statistics across all year groups, you can use the/analytics command to retrieve information from a specific time period. A specific date can be selected, or you can view lifetime data.
.png?fit=max&auto=format&n=rTIXWGIOZm-rjaEU&q=85&s=9b09afb75d902f820b044084446d2667)
Year Analytics
Statistics from a specific year group can easily be viewed using the/year-analytics command followed by the year group you want to view. All data returned is lifetime, not specific dates.
Year groups will automatically be filled in and are cached for 2 minutes to prevent spam of requests to Roblox API’s. If you change your year groups in-game, they will eventually update in Discord after the caching period has ended.
You can manually type out a full year groups name rather than waiting for options to load.
.png?fit=max&auto=format&n=rTIXWGIOZm-rjaEU&q=85&s=34b6b2a8143bc97f2857ce37a1e03942)
Staff Attendance
Easily view staff attendance by using the/attendance command which will list all staff members whom attended on the specific day requested.
.png?fit=max&auto=format&n=rTIXWGIOZm-rjaEU&q=85&s=1a48a709ef109585957c697ec6ddef5d)
Timetable
If you set your in-game timetable correctly via settings, running the/timetable command, with a valid day, will output an automatically generated timetable in the format of an image as well as a downloadable PDF file.
.png?fit=max&auto=format&n=rTIXWGIOZm-rjaEU&q=85&s=df801628f0b673d1bce9d263a141e2b5)