> ## Documentation Index
> Fetch the complete documentation index at: https://docs.jadevelopment.co.uk/llms.txt
> Use this file to discover all available pages before exploring further.
# Installation
> Comprehensive instructions on how to set up Vision MIS with your game. Follow on for step by step details on how to achieve success in your installation, and set up your Vision discord bot.
If you want to set up the discord bot integration, skip to [discord bot setup](/visionmis/installation#discord-bot-setup)
# Studio Setup
The following instructions are to be used for installing **Vision MIS** into your game through Roblox Studio. Please head to \[link here] for setting up discord integration.
**Ensure you have the licence for this product, through** [our website](https://jadevelopment.co.uk/products/jadevelopment-vision) or our [product hub](https://www.roblox.com/games/9435095450/Product-Hub)
## Getting started
You must enable **HTTP Requests** and **API Services** within the Game Settings tab in Roblox studio. This is located under the Security section. Please ensure this is enabled before opening a ticket with our support team.
After downloading the product file, drag and drop into Workspace under your game
Check to make sure your security settings are correct. You can do this by heading to **Home** in Roblox Studio, then **Game Settings**
## Configuration
Under the **jaVision** folder provided, there will be a Settings script. Please open it to continue.
An example for configuring your group is below
```javascript theme={null}
["GroupID"] = 14665139, -- Group ID
["StaffID"] = 1, -- Minimum staff role ID to use system
["AdminID"] = 1, -- Minimum admin role ID to use more advanced features, for administrators/leadership only
["StudentID"] = 1, -- Maximum student role ID
["SchoolName"] = "jaDevelopment", -- School name
["SchoolType"] = "Secondary", -- Type of school (ie. primary, secondary, academy)
["IconID"] = 0, -- Custom school logo ID
```
| **Options** | **Description** |
| ----------- | ------------------------------------------------------------------------------------------------------------------------- |
| GroupID | The ID of your Roblox group |
| StaffID | The minimum role ID a user has to be to access the staff version of Vision |
| AdminID | The minimum role ID a user has to be to access specific features, such as timetabling, settings, etc |
| StudentID | The maximum role ID a user has to be to be considered a student (e.g **10+** for staff, **9** **and below** for students) |
| SchoolName | Your specific school name |
| SchoolType | Type of school (e.g primary, secondary, academy) |
| IconID | A designated decal image ID for your school, appears on all Vision assets/features |
```javascript theme={null}
["VisionPlayerDataStoreKey"] = "RANDOMKEY-Players", -- Change this to anything of your choice (stores player data)
["VisionSettingsDataStoreKey"] = "RANDOMKEY-Settings", -- Change this to anything of your choice (stores general vision settings)
```
You are required to have unique **data store keys**, which are a series of random words or numbers that are used to identify and store data within your game.
| **Options** | **Description** |
| -------------------------- | -------------------------------------------------------------------------------------------------- |
| VisionPlayerDataStoreKey | A random key of your choosing. Saves player data for the system |
| VisionSettingsDataStoreKey | A random key of your choosing. Saves [vision settings](/visionmis/fp/visionsettings) for your game |
A webhook is a **discord integration** that allows you to send authorised messages to a discord channel from an external application, in this case, **Vision MIS.**
Learn more about [discord webhooks](https://support.discord.com/hc/en-us/articles/228383668-Intro-to-Webhooks), and how to set them up
```python theme={null}
["VisionWebhookURL"] = "",
```
In-game commands are a recently added feature, allowing you to quickly perform actions without directly interacting with the Vision MIS dashboard.
```javascript theme={null}
["Commands"] = {
-- Chat-based Vision control commands
Enabled = true, -- Enable/disable commands
Prefix = "%", -- Command prefix
["CommandNames"] = {
Isolate = "isolate",
Positive = "merit",
Negative = "demerit",
Relocate = "relocate",
NonUniform = "nonuniform",
Timeout = "timeout",
}
},
```
The code snippet above contains **key attributes** that determine the functionality of the commands
* To **disable commands**, replace `Enabled = true` with `Enabled = false`
* To **change the prefix** for commands, replace `Prefix = "%"` with your own prefix, for example `Prefix = ":"`
* To change a command name, look for the command you want to change under `["CommandNames"]` and replace the command name in the " " with your new command name.
* For example, replace `Positive = "merit"` with `Positive = "positive"`
On call alerts allow specific users with specific roles to receive alerts when a request is made from a member of staff. The configuration for this is very simple
```javascript theme={null}
["OnCallsEnabled"] = true,
["RankIDs"] = {1, 2, 3}, -- Choose every rank ID, separated by a comma which are able to manage on call alerts
```
Within `["RankIDs"] = {1, 2, 3}`, **you can add or remove role IDs**. These IDs are gathered from your Roblox group.
To add a new role to the list, just add the number of the role ID in the `{}` . For example, if I added 255, it would now look like `{1, 2, 3, 255}`
A series of attributes for nametags can be toggled to adjust to your needs
```javascript theme={null}
["NametagsEnabled"] = true, -- Toggle nametags being visible
["Staff Icon"] = true, -- Toggles staff icon above staff nametag
["Admin Icon"] = true, -- Toggles admin icon above admin nametag
```
* **To disable one of the above**, just change `true` to `false`
You are ***no longer required to use gamepass IDs*** to give out non-uniform or timeout passes. To disable the gamepass feature, just set the `GamepassID` to `0` . Otherwise, replace 0 with your gamepass ID if you wish to use this feature.
```javascript theme={null}
["NonUniformPass"] = {
Enabled = false,
GamepassID = 0,
},
```
* **To disable the above**, just change `true` to `false`
```python theme={null}
["Lanyards"] = {
Enabled = true,
ColorTheme = Color3.fromRGB(255, 146, 32),
LogoID = 0
},
```
```javascript theme={null}
["Lanyards"] = {
Enabled = true,
ColorTheme = Color3.fromRGB(255, 65, 32),
LogoID = 0
},
```
When lanyards are set to `Enabled = true`, staff will receive lanyards automatically. Please set this to `false` if you wish or staff **not** to have built in Vision lanyards.
```python theme={null}
["CustomLanyards"] = {
Enabled = false,
GroupLanyards = {
["Sixth Form"] = {
Enabled = false,
CardColourTheme = Color3.fromRGB(34, 67, 35),
LanyardTitleColour = Color3.fromRGB(255, 255, 255),
TextureType = "Student"
},
},
},
```
Custom Lanyards allow you to give out unique lanyards to specific year groups
To create a new group lanyard, copy the following
```javascript theme={null}
["Group Name"] = {
RoleIds = {1, 255},
Enabled = true,
CardColourTheme = Color3.fromRGB(34, 67, 35),
LanyardTitleColour = Color3.fromRGB(255, 255, 255),
TextureType = "Student"
},
```
```python theme={null}
["Group Name"] = {
Enabled = false,
CardColourTheme = Color3.fromRGB(34, 67, 35),
LanyardTitleColour = Color3.fromRGB(255, 255, 255),
TextureType = "Student"
},
```
```python theme={null}
["CustomLanyards"] = {
Enabled = false,
GroupLanyards = {
["Sixth Form"] = {
Enabled = false,
CardColourTheme = Color3.fromRGB(34, 67, 35),
LanyardTitleColour = Color3.fromRGB(255, 255, 255),
TextureType = "Student"
},
["Group Name"] = {
Enabled = false,
CardColourTheme = Color3.fromRGB(34, 67, 35),
LanyardTitleColour = Color3.fromRGB(255, 255, 255),
TextureType = "Student"
},
},
},
```
You have successfully added your own custom lanyard. Ensure to set `Enabled = true` for it to take effect
* `TextureType` is a configurable setting so the lanyard shows various different textures depending on the group type for example.
* Set the TextureType to one of the following: **Senior Leader, Student, Staff or Custom.** For example `TextureType = "Senior Leader"`, or `TextureType = "Custom"`
* You must set your group name correctly. Replace `["Group Name"]` with the name of the **year group** that you want to issue this lanyard to. You can find group settings later on in the configuration.
* For example, if my **Group Name** was **Year 7**, I would set it to `["Year 7"]`
* Add each of the **Roblox group role IDs** into the `RoleIds = {}` separated by a comma. Each of these roles will be given the lanyard
```python theme={null}
["NonUniformPass"] = {
Enabled = false,
GamepassID = 0,
},
```
* **To disable the above**, just change `true` to `false`
```javascript theme={null}
["Isolation"] = {
Enabled = true,
["IsolationTeam"] = nil,
},
```
1. To **enable or disable isolation**, change `true` to `false` or the other way round
2. To make **students be sent to a designated isolation** team, you can replace `nil `with the following `game:GetService("Teams")["TEAM NAME"]` .
3. Replace `["TEAM NAME"]` with the **name of your team** you wish to place students into. For example my isolation team would be `game:GetService("Teams")["Isolation"]`
```javascript theme={null}
["Relocation"] = {
Enabled = true,
TeleportToFolder = "Relocation",
["RelocationTeam"] = nil,
},
```
1. To **enable or disable relocation**, change `true` to `false` or vice versa
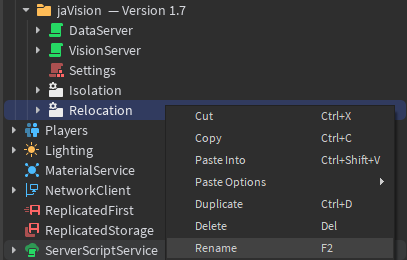
2. The `TeleportToFolder` is the **name** of the folder **which contains the parts where students will be teleported to**. By default this is "*Relocation*", however you can copy paste the Relocation folder under the jaVision folder in Workspace and rename it to whatever you want.
3. An example of the above:
 4. As mentioned in the **Isolation** tab, you can set a designated team for students to be placed into when they are relocated.
5. For example `["RelocationTeam"] = game:GetService("Teams")["Relocation"],`
```javascript theme={null}
["UI Theme"] = "Light",
["Boot Screen"] = true,
["Session Details Screen Position"] = 1,
["ColourTheme"] = Color3.fromRGB(255, 65, 32),
["Timezone"] = "BST",
```
| Name | Options |
| --------------------------------- | --------------------------------------------------------- |
| `UI Theme` | "Light" or "Dark" |
| `Boot Screen` | `true` or `false` |
| `Session Details Screen Position` | 1 (Top), 2 (Bottom Left) , 3 (Bottom) or 4 (Bottom Right) |
| `ColourTheme` | Click the values in the `fromRGB()` to select a colour |
| `Timezone` | `BST, GMT, EET, CET, ET, CT, AEST, AEDT` |
```javascript theme={null}
["Groups"] = { -- List of student groups.
{ Name = "Year 7", Roles = {1, 255} },
{ Name = "Year 8", Roles = {0} },
{ Name = "Year 9", Roles = {0} },
{ Name = "Year 10", Roles = {0} },
{ Name = "Year 11", Roles = {0} },
{ Name = "SEN", Roles = {0} },
},
```
A group within Vision **is a collection of students**, arranged by **Roblox group role IDs** into their own category. The default template is above.
## How to add a new group
Copy the following and paste it under the last group that is in the list
```javascript theme={null}
{ Name = "Template", Roles = {0} },
```
Your groups should now look like this
```javascript theme={null}
["Groups"] = { -- List of student groups.
{ Name = "Year 7", Roles = {1, 255} },
{ Name = "Year 8", Roles = {0} },
{ Name = "Year 9", Roles = {0} },
{ Name = "Year 10", Roles = {0} },
{ Name = "Year 11", Roles = {0} },
{ Name = "SEN", Roles = {0} },
{ Name = "Template", Roles = {0} },
},
```
Start configuring your group **role ids** or **name**. Each of the role IDs should be separated by a comma within the `{}`
**Lastly** - one of the most relevant sections of the configuration process, is organising your periods/lessons for the regular day
```javascript theme={null}
["ClosureTime"] = "20:55",
["Periods"] = {
{ Name = "Form", Time = "19:10", AttendanceIsLogged = true},
{ Name = "Period 1", Time = "19:25", AttendanceIsLogged = true},
{ Name = "Period 2", Time = "19:40", AttendanceIsLogged = true},
{ Name = "Break", Time = "19:55", AttendanceIsLogged = false},
{ Name = "Period 3", Time = "20:05", AttendanceIsLogged = true},
{ Name = "Lunch", Time = "20:20", AttendanceIsLogged = false},
{ Name = "Period 4", Time = "20:30", AttendanceIsLogged = true},
{ Name = "Period 5", Time = "20:45", AttendanceIsLogged = true},
}
```
`["ClosureTime"] = "20:55",` - **this is the the time the last scheduled lesson ends**\
`AttendanceIsLogged = true` - **this is for lessons, not breaks or lunches**. Set this to `false` if you want to have a lesson or other timteabled session to **not **to be registered
## How to add a new lesson
Copy the template as shown below
```javascript theme={null}
{ Name = "Template", Time = "00:00", AttendanceIsLogged = true},
```
Your **Periods** table should now look like
```javascript theme={null}
["Periods"] = {
{ Name = "Form", Time = "19:10", AttendanceIsLogged = true},
{ Name = "Period 1", Time = "19:25", AttendanceIsLogged = true},
{ Name = "Period 2", Time = "19:40", AttendanceIsLogged = true},
{ Name = "Break", Time = "19:55", AttendanceIsLogged = false},
{ Name = "Period 3", Time = "20:05", AttendanceIsLogged = true},
{ Name = "Lunch", Time = "20:20", AttendanceIsLogged = false},
{ Name = "Period 4", Time = "20:30", AttendanceIsLogged = true},
{ Name = "Period 5", Time = "20:45", AttendanceIsLogged = true},
{ Name = "Template", Time = "00:00", AttendanceIsLogged = true},
}
```
You have successfully created a new period. You can now **edit the name and time** as shown above.
# Discord Bot Setup
Please read the information below before proceeding to setting up the Vision discord bot
You must have a **fully working Roblox-setup** before continuing with setup on the discord bot
If you have not already added the discord bot, you can do so [here](https://discord.com/oauth2/authorize?client_id=1333099278997913731\&permissions=148445195472\&integration_type=0\&scope=bot). Please note, that you must be an **Administrator** of the guild (server) you wish to setup the Vision bot in.
We recommend that you read through **all of the documentation** thoroughly before contacting support — our support agents follow the same documentation to assist you.
### Initial Setup
Please **ensure you have** each of the following pieces of information before continuing:
| **Information** | **Description** |
| --------------- | --------------------------------------------------------------------------- |
| Experience Id | The experience id of your game which contains the Vision System. |
| OpenCloud Key | An API key to interact with the in-game Vision System from Discord. |
| Community Id | The id of your Roblox group/community. |
| Log Channel Id | The id of a log channel within your Discord server to send all bot logs to. |
You can retrieve the information through each of the tabs below. **We'd recommend keeping all of this stored somewhere as you get each piece of information.**
To get started, head to the [Creator Dashboard](https://create.roblox.com), if you are not already logged in make sure to do so.
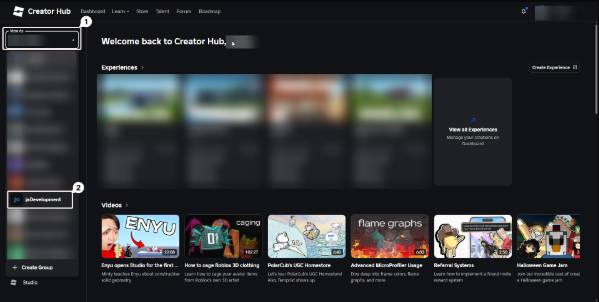
Once you are on the home page, you must click **View As** in the top left of the side-bar and switch to your **Roblox Community** **which owns your game with the Vision System** in
4. As mentioned in the **Isolation** tab, you can set a designated team for students to be placed into when they are relocated.
5. For example `["RelocationTeam"] = game:GetService("Teams")["Relocation"],`
```javascript theme={null}
["UI Theme"] = "Light",
["Boot Screen"] = true,
["Session Details Screen Position"] = 1,
["ColourTheme"] = Color3.fromRGB(255, 65, 32),
["Timezone"] = "BST",
```
| Name | Options |
| --------------------------------- | --------------------------------------------------------- |
| `UI Theme` | "Light" or "Dark" |
| `Boot Screen` | `true` or `false` |
| `Session Details Screen Position` | 1 (Top), 2 (Bottom Left) , 3 (Bottom) or 4 (Bottom Right) |
| `ColourTheme` | Click the values in the `fromRGB()` to select a colour |
| `Timezone` | `BST, GMT, EET, CET, ET, CT, AEST, AEDT` |
```javascript theme={null}
["Groups"] = { -- List of student groups.
{ Name = "Year 7", Roles = {1, 255} },
{ Name = "Year 8", Roles = {0} },
{ Name = "Year 9", Roles = {0} },
{ Name = "Year 10", Roles = {0} },
{ Name = "Year 11", Roles = {0} },
{ Name = "SEN", Roles = {0} },
},
```
A group within Vision **is a collection of students**, arranged by **Roblox group role IDs** into their own category. The default template is above.
## How to add a new group
Copy the following and paste it under the last group that is in the list
```javascript theme={null}
{ Name = "Template", Roles = {0} },
```
Your groups should now look like this
```javascript theme={null}
["Groups"] = { -- List of student groups.
{ Name = "Year 7", Roles = {1, 255} },
{ Name = "Year 8", Roles = {0} },
{ Name = "Year 9", Roles = {0} },
{ Name = "Year 10", Roles = {0} },
{ Name = "Year 11", Roles = {0} },
{ Name = "SEN", Roles = {0} },
{ Name = "Template", Roles = {0} },
},
```
Start configuring your group **role ids** or **name**. Each of the role IDs should be separated by a comma within the `{}`
**Lastly** - one of the most relevant sections of the configuration process, is organising your periods/lessons for the regular day
```javascript theme={null}
["ClosureTime"] = "20:55",
["Periods"] = {
{ Name = "Form", Time = "19:10", AttendanceIsLogged = true},
{ Name = "Period 1", Time = "19:25", AttendanceIsLogged = true},
{ Name = "Period 2", Time = "19:40", AttendanceIsLogged = true},
{ Name = "Break", Time = "19:55", AttendanceIsLogged = false},
{ Name = "Period 3", Time = "20:05", AttendanceIsLogged = true},
{ Name = "Lunch", Time = "20:20", AttendanceIsLogged = false},
{ Name = "Period 4", Time = "20:30", AttendanceIsLogged = true},
{ Name = "Period 5", Time = "20:45", AttendanceIsLogged = true},
}
```
`["ClosureTime"] = "20:55",` - **this is the the time the last scheduled lesson ends**\
`AttendanceIsLogged = true` - **this is for lessons, not breaks or lunches**. Set this to `false` if you want to have a lesson or other timteabled session to **not **to be registered
## How to add a new lesson
Copy the template as shown below
```javascript theme={null}
{ Name = "Template", Time = "00:00", AttendanceIsLogged = true},
```
Your **Periods** table should now look like
```javascript theme={null}
["Periods"] = {
{ Name = "Form", Time = "19:10", AttendanceIsLogged = true},
{ Name = "Period 1", Time = "19:25", AttendanceIsLogged = true},
{ Name = "Period 2", Time = "19:40", AttendanceIsLogged = true},
{ Name = "Break", Time = "19:55", AttendanceIsLogged = false},
{ Name = "Period 3", Time = "20:05", AttendanceIsLogged = true},
{ Name = "Lunch", Time = "20:20", AttendanceIsLogged = false},
{ Name = "Period 4", Time = "20:30", AttendanceIsLogged = true},
{ Name = "Period 5", Time = "20:45", AttendanceIsLogged = true},
{ Name = "Template", Time = "00:00", AttendanceIsLogged = true},
}
```
You have successfully created a new period. You can now **edit the name and time** as shown above.
# Discord Bot Setup
Please read the information below before proceeding to setting up the Vision discord bot
You must have a **fully working Roblox-setup** before continuing with setup on the discord bot
If you have not already added the discord bot, you can do so [here](https://discord.com/oauth2/authorize?client_id=1333099278997913731\&permissions=148445195472\&integration_type=0\&scope=bot). Please note, that you must be an **Administrator** of the guild (server) you wish to setup the Vision bot in.
We recommend that you read through **all of the documentation** thoroughly before contacting support — our support agents follow the same documentation to assist you.
### Initial Setup
Please **ensure you have** each of the following pieces of information before continuing:
| **Information** | **Description** |
| --------------- | --------------------------------------------------------------------------- |
| Experience Id | The experience id of your game which contains the Vision System. |
| OpenCloud Key | An API key to interact with the in-game Vision System from Discord. |
| Community Id | The id of your Roblox group/community. |
| Log Channel Id | The id of a log channel within your Discord server to send all bot logs to. |
You can retrieve the information through each of the tabs below. **We'd recommend keeping all of this stored somewhere as you get each piece of information.**
To get started, head to the [Creator Dashboard](https://create.roblox.com), if you are not already logged in make sure to do so.
Once you are on the home page, you must click **View As** in the top left of the side-bar and switch to your **Roblox Community** **which owns your game with the Vision System** in
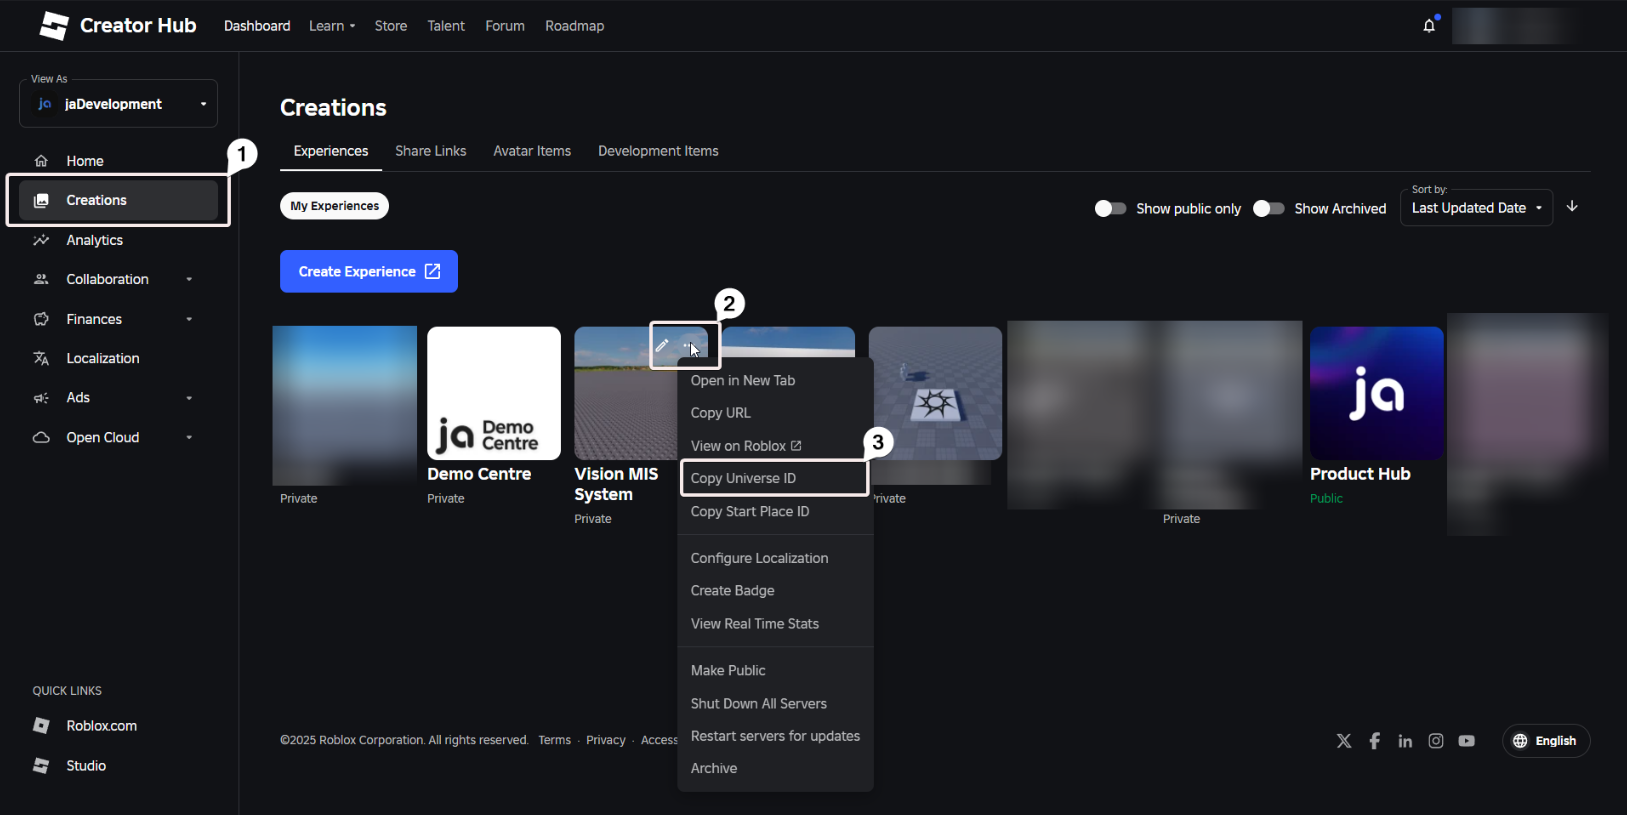
 Once you have switched to your group, select the **Creations** tab and find your experience in the list. Once you find the experience with your Vision System in, click the 3 dots that appear **when you hover** over the game. Once this is done, click **Copy Universe ID**.
 When you enter your **OpenCloud Key** into our system it automatically encrypts to ensure that, in the event of a data breach, your key remains secure and intact.
1. To get started, head to the [Creator Dashboard](https://create.roblox.com/dashboard/credentials?activeTab=ApiKeysTab), if you are not already logged in make sure to do so.
2. Once you have been brought to the API Key page, press **Create API Key.**
When you enter your **OpenCloud Key** into our system it automatically encrypts to ensure that, in the event of a data breach, your key remains secure and intact.
1. To get started, head to the [Creator Dashboard](https://create.roblox.com/dashboard/credentials?activeTab=ApiKeysTab), if you are not already logged in make sure to do so.
2. Once you have been brought to the API Key page, press **Create API Key.**
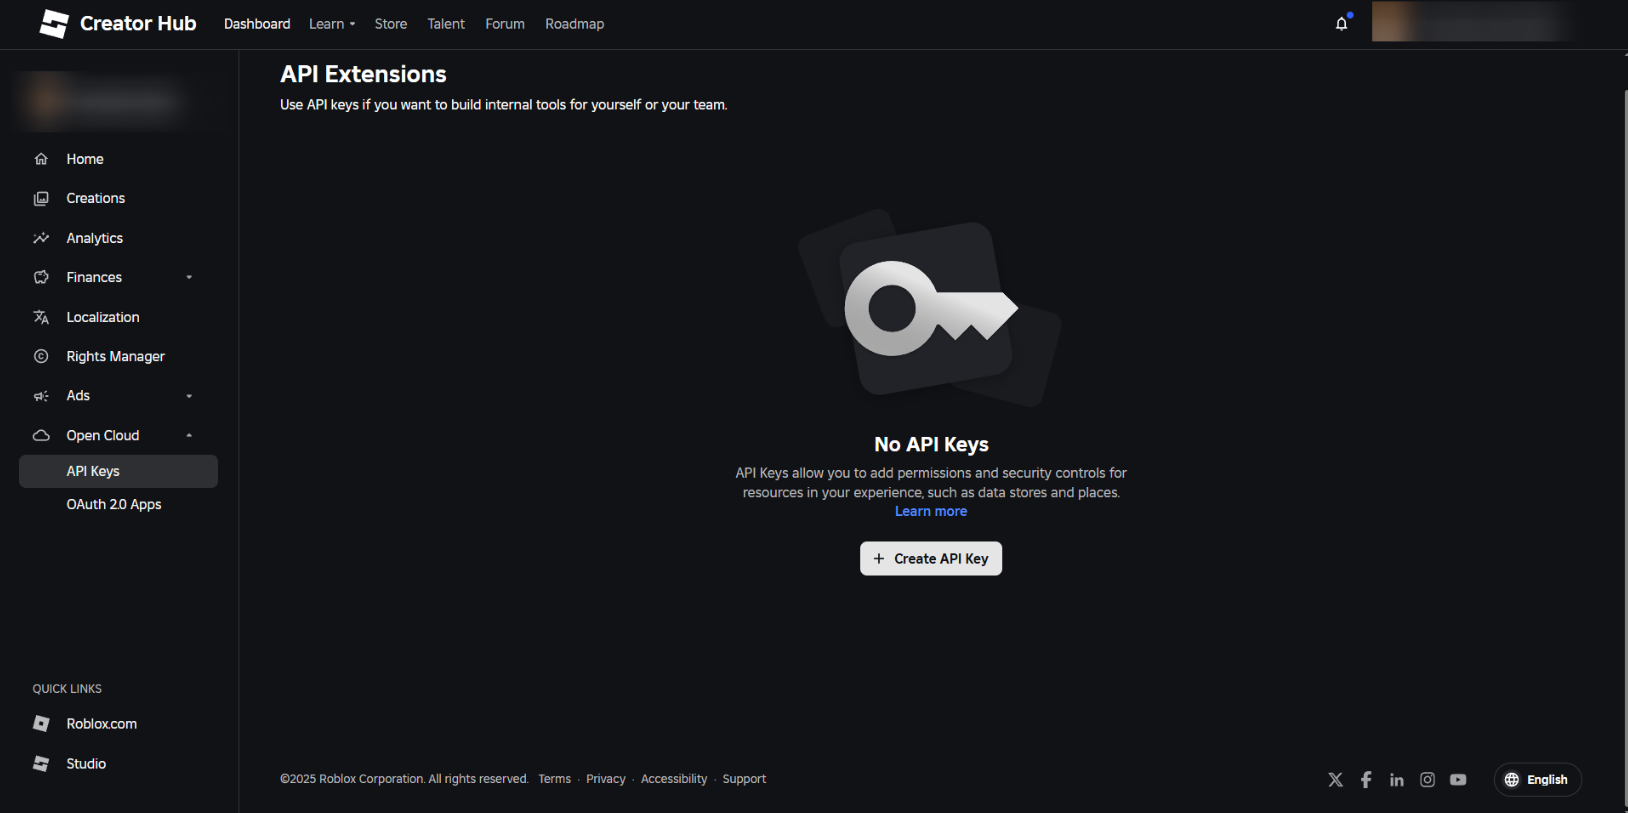 From there, you will be **presented a screen to fill in some general information** regarding the new API Key. You can fill in the fields with guidance below.
| **Field** | **Description** |
| :---------- | :---------------------------------------------------------------------------------- |
| Name | You may set any name you want, we recommend `jaVision-Bot` |
| Description | A description to describe the key, you may leave this field empty if you would like |
## Adding API Systems
### MessagingService
Next, scroll down until you find the **Access Permissions** section. Press the **Select API System** and scroll down until you find `messaging-service` , click on it and press **Add API System**.
From there, you will be **presented a screen to fill in some general information** regarding the new API Key. You can fill in the fields with guidance below.
| **Field** | **Description** |
| :---------- | :---------------------------------------------------------------------------------- |
| Name | You may set any name you want, we recommend `jaVision-Bot` |
| Description | A description to describe the key, you may leave this field empty if you would like |
## Adding API Systems
### MessagingService
Next, scroll down until you find the **Access Permissions** section. Press the **Select API System** and scroll down until you find `messaging-service` , click on it and press **Add API System**.
.png?fit=max&auto=format&n=rTIXWGIOZm-rjaEU&q=85&s=76a676c6a0921a6ce4ad75cf6382213f) After that, ensure to add your experience. You can do that by clicking **Select an Experience** and then clicking your experience from the given list and pressing **Add Experience**
The chosen experience **must** correspond with the experience id retrieved in the previous step. Your Vision system must also be **fully setup** and **working** in the experience you select.
After that, ensure to add your experience. You can do that by clicking **Select an Experience** and then clicking your experience from the given list and pressing **Add Experience**
The chosen experience **must** correspond with the experience id retrieved in the previous step. Your Vision system must also be **fully setup** and **working** in the experience you select.
.png?fit=max&auto=format&n=MigPsCyDXkWUFwVs&q=85&s=5476451d41f8a0effdbbc9e5c45295a6) Select the API System operation from the **Select Operations to Add** dropdown and click `publish`.
### Universe Datastores
Head back up to the **Select API System** dropdown, click it and scroll down until you find `universe-datastores` , click on it and press **Add API System**.
Select the API System operation from the **Select Operations to Add** dropdown and click `publish`.
### Universe Datastores
Head back up to the **Select API System** dropdown, click it and scroll down until you find `universe-datastores` , click on it and press **Add API System**.
.png?fit=max&auto=format&n=MigPsCyDXkWUFwVs&q=85&s=49d7bf7adbea1df0f54a3f5a03071886) By using the same steps before, add your experience by clicking **Select an Experience** and then clicking your experience from the given list and pressing **Add Experience.**
By using the same steps before, add your experience by clicking **Select an Experience** and then clicking your experience from the given list and pressing **Add Experience.**
.png?fit=max&auto=format&n=MigPsCyDXkWUFwVs&q=85&s=45b80302458c4bb4f8879d537ac9f0b8) Press the **Select Operations to Add** dropdown and select the following:
```
universe-datastores.objects:create
universe-datastores.objects:delete
universe-datastores.objects:list
universe-datastores.objects:read
universe-datastores.objects:update
```
Press the **Select Operations to Add** dropdown and select the following:
```
universe-datastores.objects:create
universe-datastores.objects:delete
universe-datastores.objects:list
universe-datastores.objects:read
universe-datastores.objects:update
```
.png?fit=max&auto=format&n=MigPsCyDXkWUFwVs&q=85&s=6524cbbd569191901fe18d2f8b647c32) If you **do not** select all the operations above, or select different ones your Vision Bot**will not** work as intended and may error.
### Security
Scroll down until you reach the **Security** section once the aforementioned steps are completed **fully.** Inside of the **Enter an IP Address or CIDR** enter the IP Address `0.0.0.0/0` Then press **Add IP Address**
*This IP Address allows our servers to communicate with Roblox systems through your API Key.*
If you **do not** select all the operations above, or select different ones your Vision Bot**will not** work as intended and may error.
### Security
Scroll down until you reach the **Security** section once the aforementioned steps are completed **fully.** Inside of the **Enter an IP Address or CIDR** enter the IP Address `0.0.0.0/0` Then press **Add IP Address**
*This IP Address allows our servers to communicate with Roblox systems through your API Key.*
.png?fit=max&auto=format&n=MigPsCyDXkWUFwVs&q=85&s=c88fd73c126637769d7c6de31517c8bd) Then make sure to set the **Expiration** to **No Expiration** to ensure that the key never expires. \
*You may set the key with an expiration date but you will have to update the key before it expires, it is recommended to set it to no expiration*
Once **all** the steps above have been completed fully, using the screenshots provided, press the blue **Create API Key** button and copy the key given to you.
The key given to you is your **Roblox OpenCloud Key**, keep it safe and never send it to anyone.
Vision Developers and jaDevelopment Staff Members will **never** ask you for your OpenCloud Key.
**To find your community id**, head to the [Roblox Communities](https://www.roblox.com/communities) page. Find your group on the left sidebar and click on it. **In the URL bar you will find some numbers**, this is your community/group id.
Then make sure to set the **Expiration** to **No Expiration** to ensure that the key never expires. \
*You may set the key with an expiration date but you will have to update the key before it expires, it is recommended to set it to no expiration*
Once **all** the steps above have been completed fully, using the screenshots provided, press the blue **Create API Key** button and copy the key given to you.
The key given to you is your **Roblox OpenCloud Key**, keep it safe and never send it to anyone.
Vision Developers and jaDevelopment Staff Members will **never** ask you for your OpenCloud Key.
**To find your community id**, head to the [Roblox Communities](https://www.roblox.com/communities) page. Find your group on the left sidebar and click on it. **In the URL bar you will find some numbers**, this is your community/group id.
.png?fit=max&auto=format&n=rTIXWGIOZm-rjaEU&q=85&s=20b34f5d1bd56f62567f53bad7f3422e) ## Setting Up
Once you have retrieved the necessary information for system setup,
**Run the** `/setup` **command to initiate the setup process**. You will be prompted an embed with a button on it, click the button and a modal form will popup asking you to input the information you retrieved before.
Input the information into all the fields and then click **Submit.** If the setup was successful you will be notified, else you will receive an error message stating what went wrong.
If you do not want any system logs enter a **0 (zero)** when asked for a Channel Id.
If you update your in-game datastore names within your Vision settings, the cached datastore names in our database will become out of sync with the live stores. View the **System Refresh** section to refresh the cached names.
### System Permissions
Ensure that you setup the correct permissions before attempting to run any commands. By default, some commands are locked to "Staff" ranks and some to "Admin" ranks, much like the in-game Vision system. Currently, you are **unable** to specify which commands you want to lock to administrator or staff members.
**Our current command permissions are below:**
| **Staff & Admin Commands** | **Admin Commands** |
| -------------------------- | ----------------------------------------------- |
| analytics | attendance |
| year-analytics | timeout-pass **grant** timeout-pass **remove** |
| timetable | uniform-pass **grant** uniform-pass **remove** |
| search | |
| roleplay-name | |
| timeout-pass **has** | |
| uniform-pass **has** | |
| merit | |
| behaviour-point | |
| incident | |
| isolate | |
| detention | |
Guild Members who have any administrative roles can access both admin and staff locked commands. Guild Members who have any staff roles can only access staff locked commands.
## For all of the Discord bot features and commands, please go to [this section](/visionmis/fp/botfeatures)
## Setting Up
Once you have retrieved the necessary information for system setup,
**Run the** `/setup` **command to initiate the setup process**. You will be prompted an embed with a button on it, click the button and a modal form will popup asking you to input the information you retrieved before.
Input the information into all the fields and then click **Submit.** If the setup was successful you will be notified, else you will receive an error message stating what went wrong.
If you do not want any system logs enter a **0 (zero)** when asked for a Channel Id.
If you update your in-game datastore names within your Vision settings, the cached datastore names in our database will become out of sync with the live stores. View the **System Refresh** section to refresh the cached names.
### System Permissions
Ensure that you setup the correct permissions before attempting to run any commands. By default, some commands are locked to "Staff" ranks and some to "Admin" ranks, much like the in-game Vision system. Currently, you are **unable** to specify which commands you want to lock to administrator or staff members.
**Our current command permissions are below:**
| **Staff & Admin Commands** | **Admin Commands** |
| -------------------------- | ----------------------------------------------- |
| analytics | attendance |
| year-analytics | timeout-pass **grant** timeout-pass **remove** |
| timetable | uniform-pass **grant** uniform-pass **remove** |
| search | |
| roleplay-name | |
| timeout-pass **has** | |
| uniform-pass **has** | |
| merit | |
| behaviour-point | |
| incident | |
| isolate | |
| detention | |
Guild Members who have any administrative roles can access both admin and staff locked commands. Guild Members who have any staff roles can only access staff locked commands.
## For all of the Discord bot features and commands, please go to [this section](/visionmis/fp/botfeatures)