> ## Documentation Index
> Fetch the complete documentation index at: https://docs.jadevelopment.co.uk/llms.txt
> Use this file to discover all available pages before exploring further.
# Shifts
> Shifts allow you to assign staff members to specific days of the week based on their group rank or other requirements. You can create shifts with defined patterns, set start and end times, and create assignable roles to manage staff responsibilities.
To create a shift, follow the steps below:
You must provide a **title** for your shift. This can be anything you choose.
You can select the **days** for the shift to take place; however, this is optional. If no days are selected, the shift will appear as a **Single Day**, which can occur at any time.
You must enter a **start and end time** in the format `HH:MM`
You can select **group ranks** fetched from your Roblox group. Users within these ranks will be automatically assigned to the shift.
Selecting group ranks is **not mandatory**, as you can also add users individually.
You must enter a **host name**. This does not need to be a Roblox username, and you may leave it as **N/A** if preferred.
Once you have confirmed your shift, press **Send Request**, and the system will handle the rest
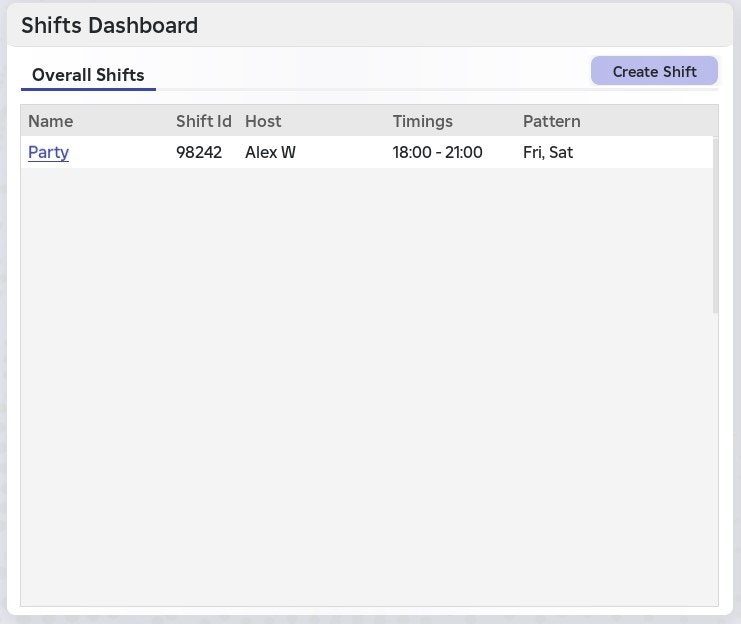
* After the shift is created, it will appear in the \*\*Overall Shifts \*\*tab on the left.
* The system will also notify you if the creation was successful.
Congratulations, you have created a shift!
 If the system catches an error during creation of the shift, **you will be notified of the issue** before the shift is created
Once you have created a shift, you can view it by selecting it from the list of shifts available to you.
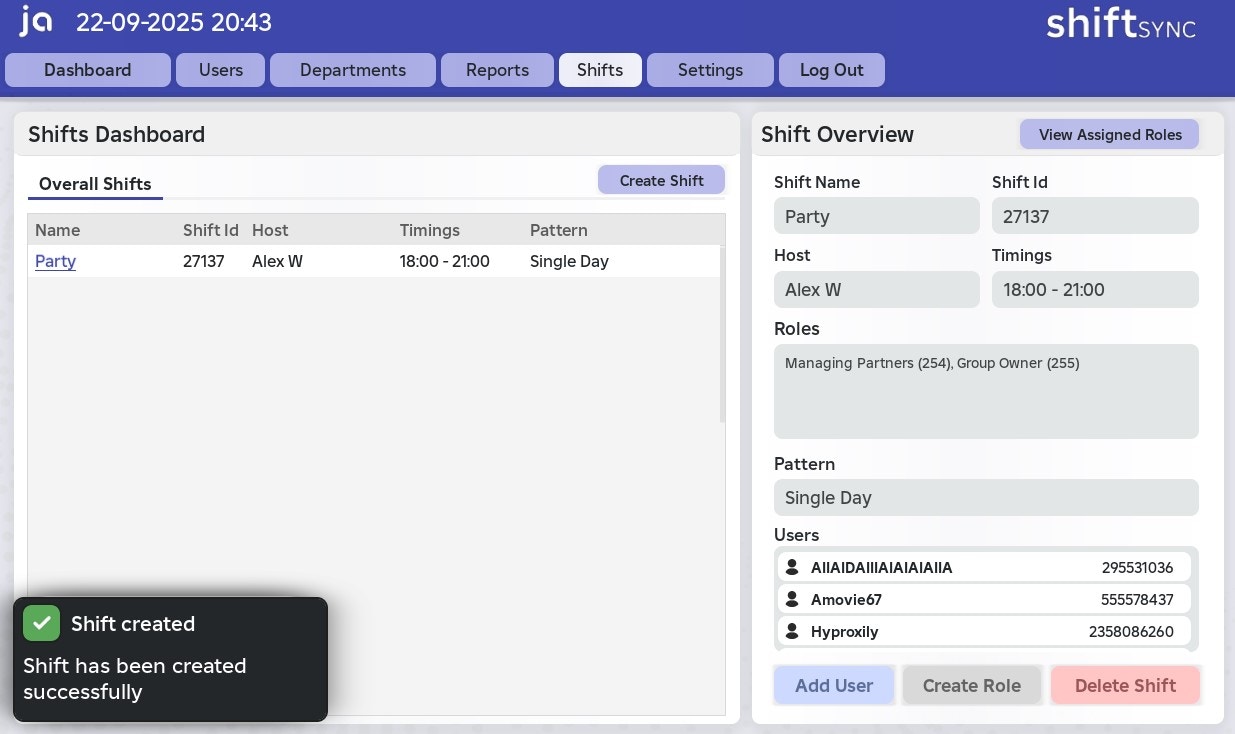
## Shift Overview
You will see a detailed summary of the shift's information, **including**:
* Shift name
* Shift ID
* Shift host
* Shift timings
* Shift group ranks
* Shift pattern
* List of users assigned to the shift
If the system catches an error during creation of the shift, **you will be notified of the issue** before the shift is created
Once you have created a shift, you can view it by selecting it from the list of shifts available to you.
## Shift Overview
You will see a detailed summary of the shift's information, **including**:
* Shift name
* Shift ID
* Shift host
* Shift timings
* Shift group ranks
* Shift pattern
* List of users assigned to the shift
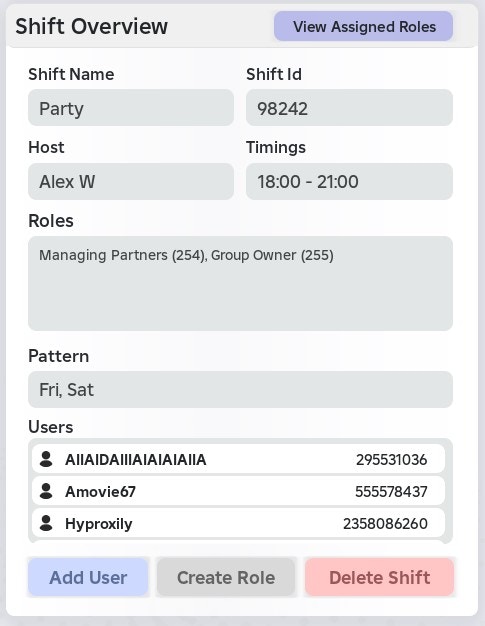 ## Add a user to a shift
To add a new user to a shift, click the **Add User** button in the **Shift Overview**.
You must enter a valid user ID for the system to successfully add the user to the department.
A valid user ID must meet all of the following criteria:
* **A user that exists on Roblox**
* **A user that is a staff member**
* A user with a group role that has staff permissions
* **A user that exists in your ShiftSync database**
* The user must have previously used your ShiftSync system
The system will notify you if the user ID you entered **does not meet the criteria outlined above**.
Once you know you have met the criteria outlined above, select **Confirm** to continue. The user will be automatically added to the shift.
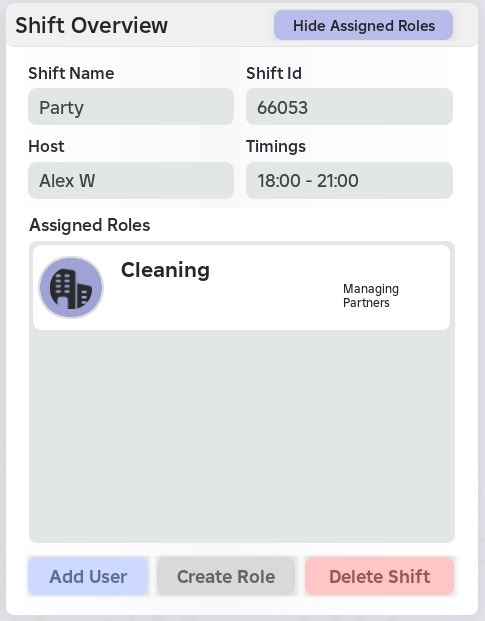
## What is an assignable role?
> An **assignable role** is a task, responsibility, or specific part of a shift that users are assigned to, indicating what they should be doing (for example, "Cleaning").
To create an assignable role, follow the steps below:
Interact with the **Create Role** button to get started.
Enter a **shift role name**, representing the task, responsibility, or specific part of the shift (for example, "Cleaning").
Optionally, you can add **user IDs** as well as **group ranks** to assign to the role.
**You must use the field by entering each ID, separated by a comma.**
* For example: `29550294, 28509301, 587103001`
A valid user ID must meet all of the following criteria:
* **A user that exists on Roblox**
* **A user that is a staff member**
* A user with a group role that has staff permissions
* **A user that exists in your ShiftSync database**
* The user must have previously used your ShiftSync system
Selecting group ranks will automatically assign all users within those ranks to the shift role.
Once you have completed the above steps, press **Confirm** to add the assignable role to the shift.
If there are any issues during submission, the system will notify you
After creating a role, you can return to the **Shift Overview** and select **View Assigned Roles** at the top right.
Users assigned to shift roles may not appear immediately until they are recognised by the system.
## Add a user to a shift
To add a new user to a shift, click the **Add User** button in the **Shift Overview**.
You must enter a valid user ID for the system to successfully add the user to the department.
A valid user ID must meet all of the following criteria:
* **A user that exists on Roblox**
* **A user that is a staff member**
* A user with a group role that has staff permissions
* **A user that exists in your ShiftSync database**
* The user must have previously used your ShiftSync system
The system will notify you if the user ID you entered **does not meet the criteria outlined above**.
Once you know you have met the criteria outlined above, select **Confirm** to continue. The user will be automatically added to the shift.
## What is an assignable role?
> An **assignable role** is a task, responsibility, or specific part of a shift that users are assigned to, indicating what they should be doing (for example, "Cleaning").
To create an assignable role, follow the steps below:
Interact with the **Create Role** button to get started.
Enter a **shift role name**, representing the task, responsibility, or specific part of the shift (for example, "Cleaning").
Optionally, you can add **user IDs** as well as **group ranks** to assign to the role.
**You must use the field by entering each ID, separated by a comma.**
* For example: `29550294, 28509301, 587103001`
A valid user ID must meet all of the following criteria:
* **A user that exists on Roblox**
* **A user that is a staff member**
* A user with a group role that has staff permissions
* **A user that exists in your ShiftSync database**
* The user must have previously used your ShiftSync system
Selecting group ranks will automatically assign all users within those ranks to the shift role.
Once you have completed the above steps, press **Confirm** to add the assignable role to the shift.
If there are any issues during submission, the system will notify you
After creating a role, you can return to the **Shift Overview** and select **View Assigned Roles** at the top right.
Users assigned to shift roles may not appear immediately until they are recognised by the system.
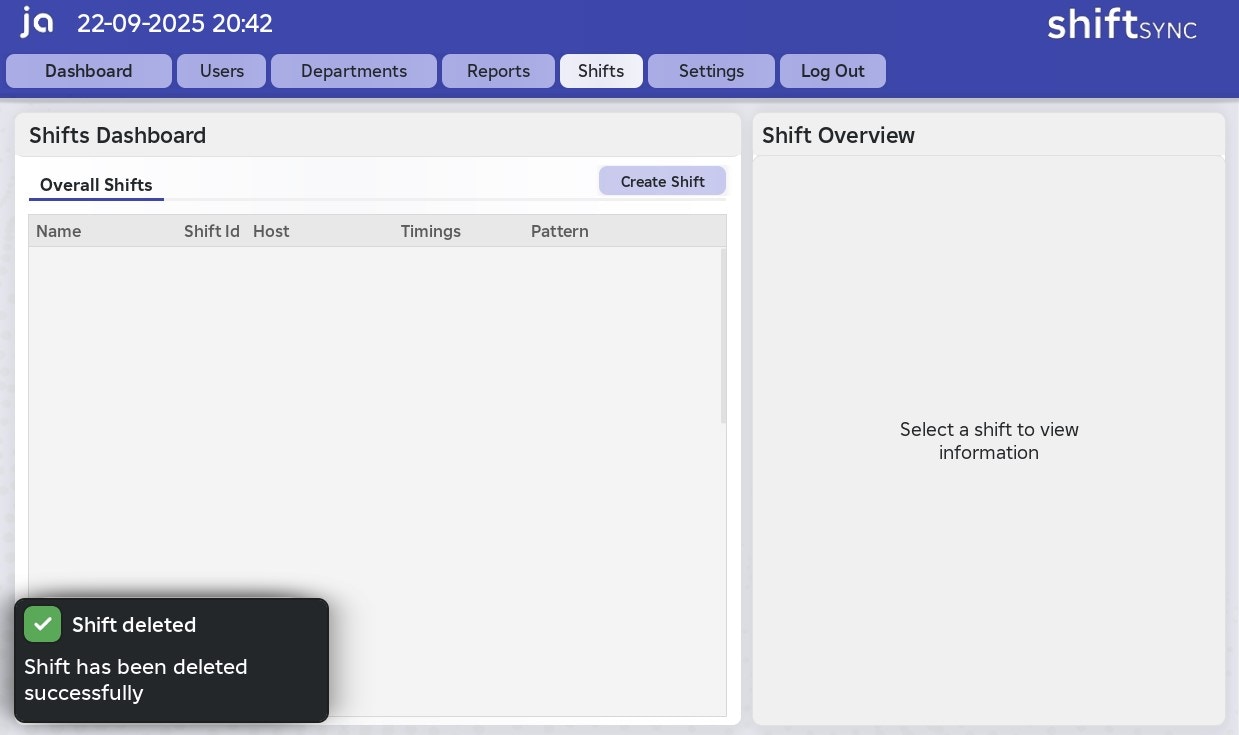
 On the **Shift Overview**, you can delete a shift using the \*\*Delete Shift \*\*button.
You will **NOT** receive a confirmation prompt, so please proceed with caution.
Once a shift is deleted, it **cannot** be restored and will be permanently removed
On the **Shift Overview**, you can delete a shift using the \*\*Delete Shift \*\*button.
You will **NOT** receive a confirmation prompt, so please proceed with caution.
Once a shift is deleted, it **cannot** be restored and will be permanently removed
 ## Your Shifts
On the [Home Page](https://docs.jadevelopment.co.uk/shiftsync/fp/homepage), you will be able to view your current shift
* If you do not have any shifts, it will say "**No more shifts today**"
* If you have an upcoming shift today, it will say "\*\*Shift starting at \*\*`XX:XX`"
* If you are currently engaged in a shift, it will display **the progress**, and **how many minutes are left**
> You can interact with the **Current Shift** button, which prompts the **Your Shifts** panel
Your Shifts displays a summarised dashboard of any shifts you are assigned to, including other members on the shift
## Your Shifts
On the [Home Page](https://docs.jadevelopment.co.uk/shiftsync/fp/homepage), you will be able to view your current shift
* If you do not have any shifts, it will say "**No more shifts today**"
* If you have an upcoming shift today, it will say "\*\*Shift starting at \*\*`XX:XX`"
* If you are currently engaged in a shift, it will display **the progress**, and **how many minutes are left**
> You can interact with the **Current Shift** button, which prompts the **Your Shifts** panel
Your Shifts displays a summarised dashboard of any shifts you are assigned to, including other members on the shift
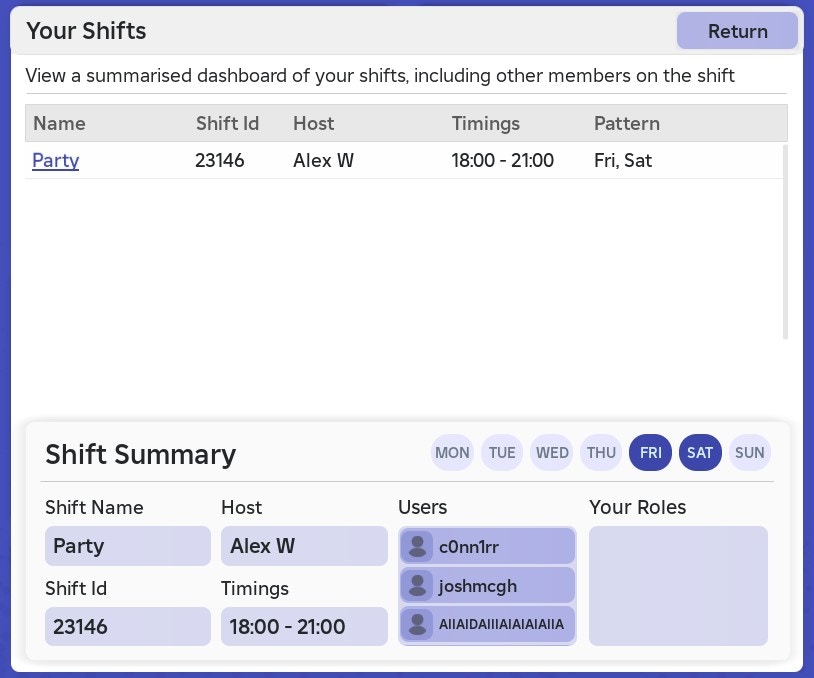 ### Shift Summary
> The **Shift Summary** displays the shift pattern, shift name, shift ID, host, start and end times, a list of assigned users, and any assignable roles.
### Shift Summary
> The **Shift Summary** displays the shift pattern, shift name, shift ID, host, start and end times, a list of assigned users, and any assignable roles.